Pictures of our EPDM RV Roof Replacement Project
1992 32' Georgie Boy Swinger

Be sure to visit Our RVing Web Site: www.outerland.com/rv/

See comments and write up below pictures.

(Click Images for larger view)

(Click Images for larger view)


Why Roof Replacement...
After much thought about sealing the roof with Liquid roof or some other roof coating, we decided that it would be better to replace the entire roof then to continue to repair it.

We also thought about all the damage reports we have heard caused by bad roofs and because this roof is now 13+ years old and resides in FL,.... Now is the time.

Because we are in FL, and its rainy season (7/4 - 7/15) we rented a covered storage place for two weeks. This had two benefits, 1st it kept the sun off us if it wasn't raining and 2nd it kept the rain off us if it was. =)


About the installation...
  • We removed all old hardware only to find out most would have to be replaced.
  • There was some slight delamination of the underlayment. We removed all loose pieces.
  • The most severe rot was around the shower skylight. (the plastic had dried out and cracked apart)
  • We removed all rot and rebuilt using Liquid Nails to hold it together. (its now Solid as a rock)
  • Because none of the roof was damp, We simply Resurfaced the entire roof with Luan.
  • We used 1+ Tubes of Liquid Nails per sheet of Luan to Adhere it to the roof.
  • To force the luan to curve with the RV we screwed each side at approximately 8"
  • We Duct Taped all Seams and edges so there wouldn't be any ruff edges
  • We laid the rubber out on the roof and made sure it was square and had enough over hang on the front, rear and sides.
  • We then rolled the rubber back to the half way point.
  • Starting from the middle, We poured the glue right on the roof in 6 to 10 inch piles and spread it with a short nap roller.
  • We did about 4 feet at a time with Christy on the rubber and me on the wood she rolled it to me.
  • She then worked out the bubbles while I rolled out the next section of glue.
  • You have plenty of time to lift and reset it, but the rubber is heavy
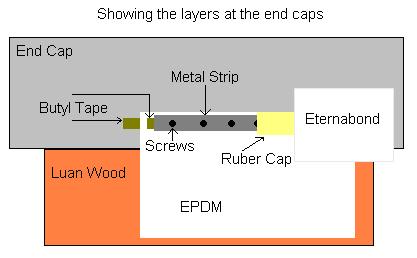
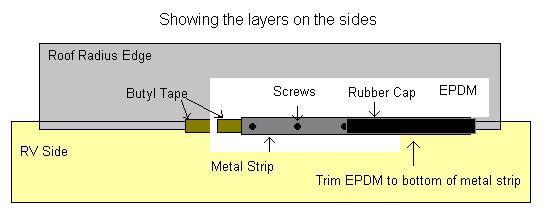
  • On the end caps and side rails We put Butyl tape below and above the EPDM then screwed the metal strips back on. (per instructions) Builder didn't use any butyl on sides.
  • We cut all opening (X patern) and pulled the extra down into the hole, stapled and cut exess off.
  • We put Butyl tape on all items (Vents, Skylight, etc..) making sure item was square, we screwed corners first.
  • We used Eternabond on all square openings (Vents, Skylight, etc..) and used Lap sealant on round openings.
  • We used Eternabond on the front and rear caps.
  • Because of extra thickness, We had to replace the interior hardware (Crank, Dial, etc..)on Winegard antenna.
  • We Believe we did a better job of installing this roof then the original manufacturer.


  • What we have learned...
  • We didn't have an EPDM roof originally. (I dont know what it was, it was gray on both sides)
  • EPDM is very tuff stuff. You would really have to try to cut or damage it.
  • It is easier to set up the saw hoarses on top of the RV and cut up there rather then carry wood up and down
  • Bubbles are a BITCH!!! Get them out quick. (we left a few small ones, Oh Well)
  • Careful where you step, Cut Opening quick (you cant see them with the EPDM over them)
  • Liquid Nails is Awesome (I already knew that though)
  • You don't have to remove the air conditioner from roof. Just keep moving it out of the way.
  • It takes 2 people to remove an awning and 3 to get it back on.
  • Eternabond is nearly impossible to get off objects and stays sticky forever.
  • Thank God for the covered storage! It was a life saver both from rain and sun.


  • Conclusion...
    Overall this wasn't that bad of a project.. I would give it a difficulty rating of 7 or 8 out of 10, Christy said 7. There is a lot to do so it takes a lot of hours (50+) but none of it is that difficult.

    I would take on another roof for my own RV, Also if you are technically inclined I think you can do this with out a problem. There are no special tools needed or special skills,...

    The best part is we have used the RV twice with heavy rain and we have had heavy rain while in storage and not one drop has come in the RV.


    Tool List...
  • Cordless & Electric Drill
  • Jig Saw with fine blades
  • 1/4 drive drill tip (Best purchase I made)
  • 1/4 Drive Socket with 1/4 Drive Ratchet
  • Ladders (two 6 foot step and one 16 foot extension)
  • Utility Knives (lots of blades)
  • Extension Cords (lots)
  • Saw Hoarses
  • Staple Gun
  • Hammer
  • Tape measure
  • Assorted Drill bits
  • Flat head and Phillips head screw driver
  • Caulk Gun
  • Chisels
  • Scissors
  • Diagonal Cutter (wire cutters)
  • Pliers
  • Push Broom, Regular Broom, Hand Broom
  • Roller


  • Total Cost... (Items are listed as purchased not itemized)
    9.5' X 35' Dicor EPDM Membrane
    Dicor Install Package
    (2Gal Adhesive, Butyl Tape, 6 Tube Lap sealant $529.65

    2 - 50' Rolls of Eternabond $95.05

    2 - Week Rental of storage facility (Only needed 1 week) $70.37

    16 - Pan head screws for interior stuff
    4 - 100cnt boxes of 1/4 head Stainless Steel screws $39.42

    2 - Rolls Duct Tape,
    1 - Short Nap Roller,
    8 - 4' x 8' Sheets Luan $100.57

    1 - Refrigerator Top,
    3 - 14" x 14" Roof Vents,
    1 - 16" x 16" Smoked Skylight $172.12

    2 - Vent Stack Covers
    1 - 14" x 14" AC Foam Seal Kit $46.87

    2 - Extra Rolls of Butyl Tape $10.47

    1 - Winegard Antenna Crank
    1 - Winegard Directional Dial kit $17.41

    Total: $1081.93

    As more credit card bills come in I may revise the total but this is fairly accurate.


    Frequently Asked Questions (FAQ)...
    Q Could you tell us about how you applied the glue and rolling the roof material into place? Does the glue dry fast? Can it be pulled away and reset?
    A We laid the rubber out on the roof and made sure it was square and had enough over hang on the front, rear and sides. we then rolled the rubber back to the half way point. Starting from the middle, We poured the glue right on the roof in 6 to 10 inch piles and spread it with a short nap roller. We did about 4 feet at a time with Christy on the rubber and me on the wood she rolled it to me. She then worked out the bubbles while I rolled out the next section of glue. You have plenty of time to lift and reset but the rubber is heavy and I could not lift the rolled section of rubber.

    Q If you was doing this for someone else, how much would you have to charge for labor?
    A I am not sure I would ever want to do another roof but it took us approximately 50hrs. total (25 each) We were done within a week. (started on Tuesday and finished Sunday). We are self employed so we could take the afternoon off to work on the RV.

    Q Where did you buy the new rubber material?
    A We bought all the material (except luan, duct tape & roller home Depot) at a local RV shop Harberson Swanston RV www.harbersonrv.com they were very competitive in price and nice to deal with.

    Q how did you get the one big piece of rubber up on the roof? How much did it weigh?
    A The EPDM came in a 10' long hard cardboard tube. I leaned it against the RV and then climbed up. Christy squatted and bear hugged it on at the bottom and I squatted and grabbed it at the top. We both lifted, as soon as I was standing I backed up and slid/levered it up. That was one of the most labor intensive parts of the job. The EPDM is heavy! Another tough job was getting it out of the tube. Christy sat on the tube and tried to keep it from moving while I pulled with all my might (I pulled the tube and her but the EPDM didn't move) I figured out that if I twisted the roll tighter while I pulled it would come out.

    Q Can you explain a little more about "butyl tape below and above all edges?" Do you mean you put it under the edge of the EPDM where it overhangs the side - between the rubber and the sidewall - and then again just under the metal trim piece? In other words, the EPDM is sandwiched between butyl?
    A That exactly correct on the sides and front and back the EPDM is sandwiched between a layer of Butyl tape. That is what Dicor calls for and in the installation kit there is a little instruction card, on the card they have pictures that show this.


    Q Were there any problems with an extra layer of sheathing on the roof? For instance, mounting the skylights/AC/etc. did you have to do anything special on the interior because they were raised a bit?
    A There was no problem adding the extra layer of wood. Actually it was recommended by the workers at the RV place I bought the stuff from. We did replace the interior winguard parts (they are cut to length and they were originally cut short)

    Q On putting the side rails back, was it hard lining up the holes for the screws? and was the holes good or did you have to fill or drill new screw holes?
    A Of the hundred of screws holding the side rails, only about 3 were rusted to the point that I had to grind them off. I just left those screws in the holes and put new screws right next to where they were. It was a little difficult to get the holes lined up but we drew a pencil line where the holes where at the end of each metal piece as a guide to the holes.


    Special Thanks to my wife Christy without her I couldn't have done it.


    Be sure to visit Our RVing Web Site: www.outerland.com/rv/